Pages

Thursday, August 8, 2013

1860's Civilian Men's Shirt

A while back I had a gentleman commission this shirt....
I used pima cotton for the first time ever. One of the most fabulous materials I've ever worked with. Perfect weave and incredibly smooth! I was able to find the best price with an eBay seller - who unfortunately no longer offers this product. :( It is available for just a tad more here at fabric.com.
Made in the same fashion as mentioned here.
I sewed the majority of this one by machine. I always do buttonholes, gathering threads, and other finishing touches by hand tho...
China buttons from my secret "supplier".
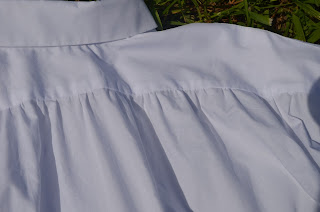
 Very lightly gathered back. 
Buttonholes - not my favorite part of mid-century sewing. ;)
 
I am still chugging along on the biggest 'commission' I've ever taken on in my sewing career...An overload of pictures will come around sometime in September.. ;)
 
Love,
Brooke

Saturday, July 13, 2013

'Nother 1860's Civilian Waistcoat

The front is silk taffeta, as requested, from Pure Silks. It was my first time ordering from them. I was very impressed with the quality of the material as well as with the shipping time. It was coming from India and I only had 2 weeks from the day ordered till I needed to ship the finished product. And it got here with time to spare. 
Gotta love those covered buttons!! 
I sent one mockup to my client. There was one slight alteration on the lapels, but thankfully I was able to recruit my mom to help me out with that as I was pretty much just having a duh moment and couldn't get it done. lol
It has all the same credentials (pattern-wise) as this one I've previously done. 
The back - I used polished cotton from Needle and Thread (Wooded Hamlet). My first time working with the stuff, but it was also fabulous quality-wise and I quite liked it.
And I got the buckle from there too...  
 
Ended up making the whole thing from start to finish in 2 days....It definitely seemed easier then that last one I made...perhaps that means practice does make perfect.. ;)
 
Love,
Brooke

Wednesday, May 15, 2013

Samantha's Dancing Dress

My friend Samantha needed a new dress for an event her dance group was doing...We started planning it a couple months back and I got the fabric a few weeks ago. But life got in the way and I didn't start working on it till last week.
 This is was the inspiration - mainly for the skirt. She drew a sketch as well which was incredibly helpful! I always love it when my clients know exactly what they want!
The actual cutting and construction of this dress took place in less than 32 hours. I started on a Sunday night at like 7 or 8 and  worked till 3 am. Got up around noon the next day and sewed all day, once again till 3:30 am. Then got up at 8 took out the remaining gathering threads and headed into my 'real job'. Panic threatened to take over, but thankfully a good friend kept me company by texting me most the night. I'm pretty sure that's the only thing that saved me..So thank you, Joe! :) Hopefully I've learned my lesson and won't procrastinate so badly anymore.
 I've previously made her a dress so I just altered "her pattern" from a front opening, yoked bodice to a back opening, slightly gathered, natural waist number. Also adding a boat neckline 1/2" narrower and 1/2" lower then normal. The sleeves, as you can see, are single puffs. She choose the lovely material from fabric.com - available here.
There's just something about china buttons that make me happy (especailly when I can get my mom to sew them on. hehe) I'm so glad I found a fellow reenactor that has a seemingly never ending stream of them...I always had soo much trouble finding them before.
There's 3 4.5" flounces. The top one was sewn on with a little frill left sticking up as seen in the CDV up top. These were by far the most time consuming part. I first sewed the hem facing to the bottom of the skirt. Then attached the first flounce. Next I sewed the hem facing up and continued onto  attaching the last 2 flounces. I had some trouble with my gathering threads breaking. So that was extremely irritating, but a good reminder to not use old thread for tasks such as those. I did a 6" hem facing as usual.
Piped the neck line and bottom of the waistband. Pretty much my staples - I'm not fond of how it tends to look when I sew skirts on to the waistband without piping. :-/ And I feel like it makes the neckline lay much better as well.
I think I gauged this skirt and sewed it on in record time! I've come to love gauging now that I can do it somewhat evenly on prints...not with standing - I do love doing it on plaids and stripes even more. :P I did a 2" fold over on top of the skirt to balance it or whatever its called...so that actually means there's only 1.5" different between the front and the back since I have to have .5" 'seam allowance'.
And with that we have the finished product on the lovely model, Samantha!!
*Photo credit: Samantha
 
Love,
Brooke

Friday, May 10, 2013

Delavan Civil War Days 2013

This weekend delivered our first event of the season! This winter felt longer then I've ever remembered, but we've never even done an event this early before. I guess it just means my love for the hobby is growing despite the brief considering of terminating my involvement last fall.
The weather looked as tho it might crash the party, but it didn't end up being very bad at all. So that was really nice. Saturday started out a bit slow, but as the day went on went on we started coming out of our shell and actually talked to some people. lol
 
My beautiful big sis, Michelle! Isn't her dress like perfect. I think I like it more everytime she wears it.
Miss Cherice (more commonly known as Sarah). Such a cutie! 
My wool ended up being the perfect choice for the dismal weather. It kept me completely comfortable all day and I love how the water just rolls off of it rather then soaking in. I did use my wool shawl alittle, but most the time it was just hanging off my arm. 
Little sis, Megan, looking more adorable then ever. 
Drill. 
We farbed out and walked to Casey's at lunch to get pizza. It was quite fun to say the least. I think the best part was when I walked thru the door and the cashier looked at me and said "Good day.." I had alittle trouble keeping a straight face. lol oh my.
Probably my favorite picture from the weekend. These are the ones that are going to be even more special here in a few short months when she leaves me. :'( lol
We were overjoyed to see the delightful Meister family there! I'm always so inspired by Sarah's work, not to mention her fabulous personality.. She's by far one of the sweetest ladies I know!
Here you see Chis taking his turn holding the charming little, Anne! 
And then Tom... 
Last but not least Michelle..she didn't put her down for most the afternoon. Can you tell she loves babies?
 The pretty little girl herself. Doesn't she have the most wonderful eyes?
  One of her older brothers, Judah.
The twins. Looking alittle mischievous if you ask me. 
Sarah and I taking a moment to watch the water run thru the little creek. 
Another one of my favorites!  
 Could they be any cuter?!
Same as last year it started raining during the battle...does make for sweet photos.
 Some awesome cavalry action right there!!!
Michelle has vowed she's never going to take pictures of farbs so thus the result of only 2 good pictures from the battle.. hehe
Chris and Lee - the troublemakers.
Megan, me, Sarah and Michelle towards the end of the dance. (Thanks Lee for getting the one and only group picture of us...) We have bunch more pictures for your viewing pleasure here. Also, Tom has a lot here!
 
All in all it was a very fun day that ended with a bang! Its quickly becoming one of my favorite events. This was only the 2nd year so it may not be as big as some people like, but I actually think we have more fun and get to spend more quailty time with folks when things are more relaxed. One of these years we'll get perfect weather and it'll be even more epic! Anyway here's the website - check it out and for the locals definately plan on coming out next year. ;)
Love,
Brooke

Friday, April 5, 2013

Family Engagement!!!

Congratulations to my big sister Michelle and her fiance` Josiah on their engagement! Hearing the news was the perfect way to end an already lovely Easter Sunday. :)
We've known Josiah's family for 7 or 8 years - 7 months of which they've been courting. I've come to the conclusion that I have the best future brother in law ever. I can honestly say Josiah is one of the very best guys I know and I couldn't have picked a better person for my sister to be with! So... Welcome to the family, Josiah!! (Hopefully you won't take that as a threat! LOL) I'm soo excited to get another bir brother! :D Already have lots of awesome memories and looking forward to many many more!
He did such an awesome job picking the ring out! It suits her personality perfectly! I mean come on - it even has hearts on it. :D 
No, date decided on yet, but the wedding will most likely be later on this year. I'm soo excited! I do so love weddings and my sister's wedding at that - even better. On the flipside she'll probably be living 4.5 hours away and I'll miss her soooo terribly much. Bittersweet! Either way I'm very eager to see what God has planned for their future together and I wish them all the happiness in the world!
 
Love,
Brooke

Monday, February 11, 2013

1860's Chemise for Yours Truly

This is another piece for the HSF challenge. The category for this fortnight is "Under It All". I've had this piece in mind since day one. I mean, really, who can't use more chemises?!
I'm going to apologize right now for the loathsome photos. Didn't sleep a wink last night and started a new position as a nanny today. I'm completely exhausted and had no energy for styling my hair let alone standing outside in 30 F weather for better lighting. In short I was lazy and my photographer doesn't get home from work early enough for outdoor lighting anyhow.
The fabric is actually a 50+ year old hospital bed sheet. 100% cotton.The story is thus - a small jailhouse in rural Missouri was preparing for the Cuban missile crisis these sheets were one of the things they stocked up. My cousin rescued them a couple years back and they've come in fabulously handy! They're completely sturdy even after being washed and ironed their quite stiff and crisp. I'm told that's because that's what *good* sheeting is like. Unfortunately the majority of them have some water stains. They can often be over looked or cut around so its all good. Only notion used is thread.
I'm hoping its far enough off shoulder that it won't show on future party dress necklines that will expectantly hit me on almost the same spot. It will be first worn in May or June. Depends on the dresses I choose to wear for which events.
I technically didn't use a pattern. I made a relatively farby chemise, using a McCall's pattern I don't have the number for, several years ago. I loved it because it doesn't show at my neck line when I'm wearing boat necks nor does it have tacky sleeves sticking out my short/open sleeves. Frankly there's nothing wrong with that, but my OCD side has to show its self and in turn underpinnings peaking out is one of my biggest peeves. However, the whole reason for wearing a chemise is to protect ones dresses from perspiration and - equalling less washings, etc. So this little, sleeveless thing was completely useless in that regard... Not to mention its way short like barely to my hips/dropped waist - tho that does work okay for me most the time. I'm hoping to alleviate the need for wearing a petti under my hoop. It was also very narrow width wise. SO....I layed the existing chemise down on my fabric traced the armscye curve and then just free handed everything else from there. Added about a foot in length (was able to use the original sheet hem = win!) Next I took the original yoke shape and copied it pretty much exactly.
I actually used the pattern from a modern blouse sleeve pattern as a base for the sleeves (yes, I'm prepared for a wet snood lashing, not with standing - the armsyce curve matched PERFECTLY). Its basically nothing like the original thing, but it gave me somewhere to start and also made me feel little more comfortable diving in, I guess. I made it way narrower and much shorter then the existing pattern. White cotton it like gold around here and I would have hated to waste any... haha They're essentially an elemental raglan style. So they are sewn into the armsyce and then gathered to the yoke as part of the neckline. I had been planning on gathering the bottom and adding a very narrow band (mainly cause I thought it'd look cute), but once I tried it on I thought better of it- the circumference of my bicep fluctuates frequently and I can't stand sleeves that end up being to tight after a couple weeks containing more physical activity then I usually experience and...poof...there goes any comfort there ever was. Anyway I ended up doing a 1/4 hem. That way if I'm not happy with the length then it will be easier to change.
I made it for use in 1860-65. I wouldn't swear by its accuracy. I, of course, used all period correct techniques and personally think the shape is suitable. Any thoughts y'all?
It took me around 4-5 hours I think. Everything is hand gathered and I had to rip the yoke of and redo it all since I had the sleeves spread to far forward and back on the first round. It was cutting into my underarm and I didn't see that being to fun to deal with. All seams are flat felled, as well, and of course I hand whipped the yoke down on the inside. Top stitching just kinda turns me off when it comes to most things. Total cost is: $0.50 Yep, you read that right! 50 cents! These are the kind of project I love. ;)
And that's the happy ending of a story about a girl who got the chemise of her dreams!!! Hey! its the little things right? Its really got me itching for an event now...only a few more months.
Love,
Brooke

Sunday, January 27, 2013

1860's Civilian Waistcoat & Cravat

 Since I took this on awhile back and didn't finish it right away...I decided to use it as my UFO project for The Historical Sew Fortnightly Challenge I'm participating in. It seems to be a common trend for me... as usual this exploit was full of many firsts.

For the front I used cotton velvet from fabric.com and the back is silk taffeta from Fashion Fabrics Club. (*Note to self* they have great price on it and its perfect. No slubs, crisp, and lightweight.) The lining is white cotton. As far is notions go the only thing I used were the button forms and buckle for the back.
 First time doing welt pockets. Quite the experience. Velvet was an all around pain in the neck to work with. I'm definitely not planning on rushing into another project involving the stuff. I've never really made anything with it before so it was a true learning affair. lol
 The pattern is based on Past Patterns: Single Breasted Shawl Collar Waistcoat. One of the main reasons I went for the shawl collar is so it would perhaps look a tad bit more "formal" (yes, I know different fabrics were the main factor of formality). I'm eager to try one with notched lapels... or whatever the PC term for them is....
Both items were made to be accurate for 1860-64.
 These buttons, arghhhh. I thought they were going to be the end of my sewing career. :p lol It took me hours to get them together...the velvet was just so bulky and obviously frays like bonkers. Not to mention the buttonholes - since I was worried about getting them made without the front turning completely turning to fuzz...I, first, machine sewed where the holes would be. Then cut them and hand sewed regular buttons holes. Wasn't quite the charm I was hoping for. The machine stitching often pulled off the fibers when I was whipping around it. In the end I prevailed and they didn't look half bad. ;)
 Unfortunately I have absolutely no clue how many hours it took for me to complete. I've never kept track of such things. I would say its been one of the smaller, but more time consuming things I've made. Between the welt pockets, covered buttons that wouldn't cooperate, 80% of it being hand sewn and bagging it backwards the first 2 times it probably took over 30 hours... 
The materials cost around $35, I think. My sister ordered everything so it may not be exact on the dollar, but close enough. ;)  Not sure when its going to be first worn as this was for a client and it probably won't be till April or so...
 I would say its about 95% historically accurate. While I did my best to find the most accurate materials - the 5% missing is due to the difference in fabric from the 19th century and today. Otherwise the cut, techniques, etc are period correct. Even the cravat is copied from originals. ;)

 I thought this segment about clothing etiquette was incredibly helpful for knowing when it would be proper to go with/without a waistcoat, etc....
 "Clothing etiquette will depend a great deal on the type of impression, the personality of the gentleman, societal perceptions of the appropriate attire for the situation, and the types of activities the gentleman is engaged in.
 In the most general form... vest, coat, and cravat/neckerchief are needed for situations deemed more formal... going without is accepted in situations deemed less formal. If the gent is seen "about town", he is probably on some business he deems moderately formal, as in.. he'll be seen by persons upon whom he'd like to make a good impression. A vest/waistcoat and coat are important for that occasion. If he is engaged in heavy labor... or at a picnic on a hot day... or in the evening hanging around home... less formal situation and the coat definitely can be and the waistcoat/vest may be left off. He may choose to replace the coat and sometimes a vest with a smock/ work-shirt for heavier or dirtier tasks or sporting events (including hunting, which leads to the number of militia troops and early war uniforms that include them as a key uniform component) and still be deemed "decently" dressed. Remember that the farmer who may wear a work-shirt to tend his fields and animals would don a waistcoat and coat before squiring the Mrs. to shopping in town... or meeting with the bankers concerning his loan for next season's seedlings... or certainly a dance, supper party, or church service. The young dandy might start the lakeside outing in his nice linen dittos, but remove his coat to row the boat or take his afternoon nap in the sun or carry the basket.
 Among the very working-class, one does see pictures of gents with just a shirt, coat, and neckerchief (no vest/waistcoat in sight). One can also find pictures of gents in waistcoats/vests but without coats... but often there are "occasion indicators" in these pictures as well... a camaraderie of men, interrupted work, at work, very hot day, and such, that tell us when they thought this appropriate." Taken from this post.
  Not necessarily part of my UFO, but it went to he same gentleman. Thus I was inclined to include it in this post. It was the first time we'd done a pretied cravat. Pretty much just winged it. So not much to say about it. :p Its made up of 3 seperate peices. The bow, knot, and band. Each peice is sewn up then all are attached to each other...It buttons in the back and is made out a lovely, forest green silk taffeta.
 
Love,
Brooke